

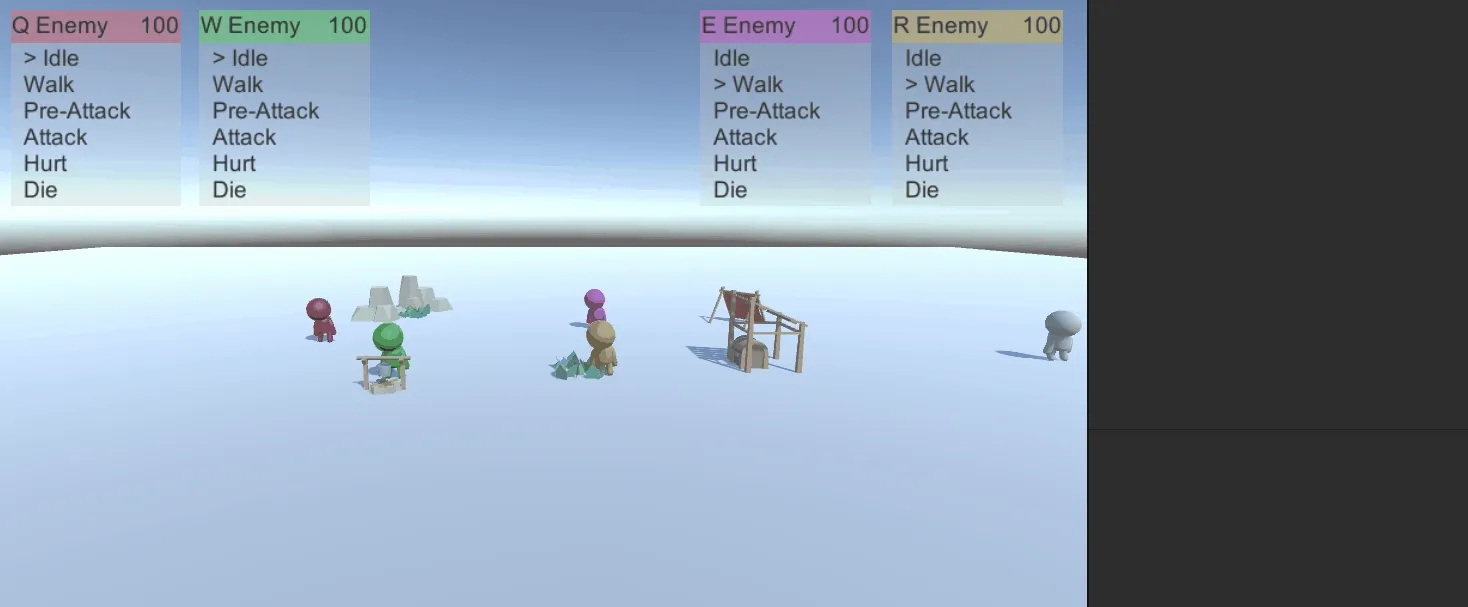
For the final project for my advanced game AI I decided to recreate a simplified version of the enemy AI in Genshin Impact with the help of the Genshin Impact AI talk at GDC. At the end I created a simple Ai system that uses a state machine with an idle, walk, pre-attack, attack, hurt and die state.
GDC & Overview
For this project, we were required to base it off of a GDC talk about AI. After looking through some talks I decided on the Genshin Impact talk as well as the Spiderman talk. I chose the Genshin Impact one as the system I’ll be recreating as they went over the overall system they use so I was able to get a rough idea as to how it works. The Spiderman talk went more into depth in the system they use which is somewhat similar to Genshins, but I also liked how the Spiderman talk displayed debug information so you could see what the AI was doing. Due to time constraints, I decided to focus more on creating a simple finite state machine with an idle, walk, pre-attack, attack, hurt and death state for the enemies. From my understanding, Genshin uses a hierarchical state machine which controls all the AI in the game as well as a decision tree.
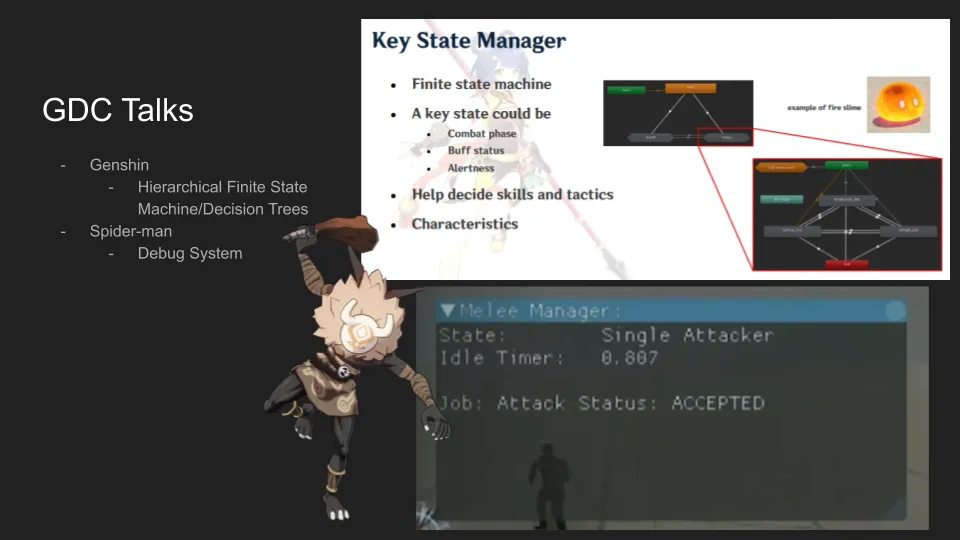 Slide from my final presentation
Set-Up
The main set-up of the system includes an EnemyStateManager.cs script that’s placed on each enemy and the GameManager.cs which is on the game manager object.
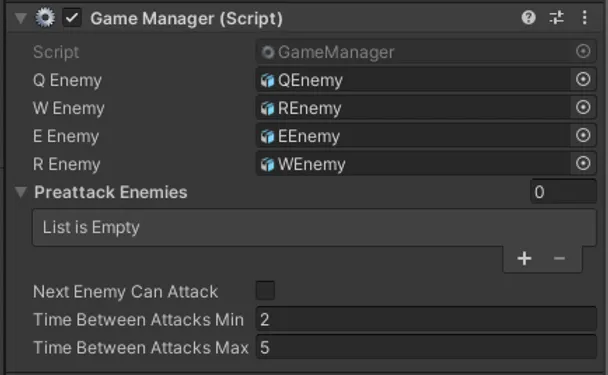
The GameManager.cs stores all the enemies as well as a Preattack Enemies list. This list is used to determine the attack order of the enemies. The one at the front of the list attacks first.
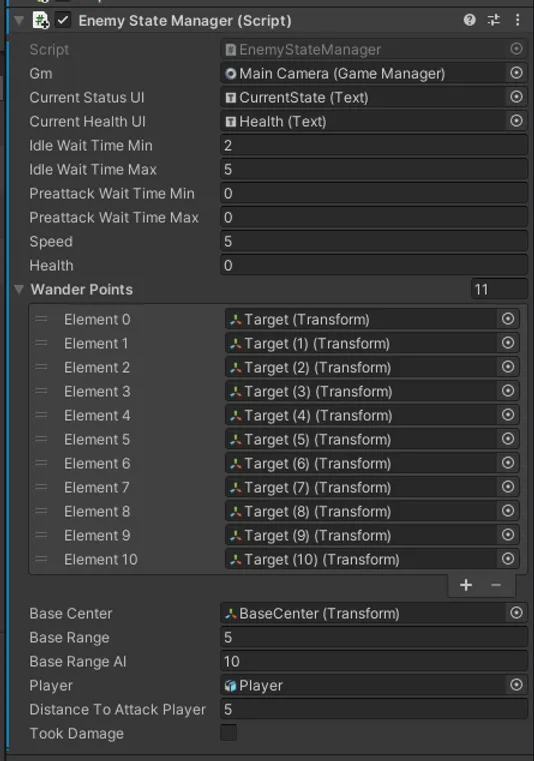
The EnemStateManager.cs holds a lot of things including the Idle Wait Time Min/Max. This is used to determine how long they should stay idle before walking. There’s also speed and health (health is set to 100 at start). The wander points are just a set of points in the scene for the AI to wander to. Lastly is the distance checks variables. Base Range decides how far the player has to be from the base while the Base Range AI is how far the AI can get from the base once in the Pre-Attack stage.
public abstract class EnemyBaseState
{
    public abstract void EnterState(EnemyStateManager enemy);
    public abstract void UpdateState(EnemyStateManager enemy);
    public abstract void OnCollisionEnter(EnemyStateManager enemy, Collision collision);
}
The EnemyBaseState.cs is the base for the state machine. The EnterState() and UpdateState() were used but OnCollisionEnter() never got used but was created since I thought I would’ve had to use it for the attack state and if I had tie to add animations, it most likely would’ve been used.
Idle & Walk State
Creating the AI for the idle and walk states were probably the most straightforward states to implement. As shown earlier, the AI state has a time range for how long the idle state should last. Every time EnterState() is called for the idle state, a random time is generated from the min and max values given. After that time has passed, the AI enters the walk state, walks to their position which is chosen randomly from the list and once they get there, they enter the idle state again.
void MoveToTarget(EnemyStateManager enemy)
{
    // Move
    enemy.gameObject.transform.position = Vector3.MoveTowards(enemy.gameObject.transform.position, target.position, enemy.speed * Time.deltaTime);

    // Check if at target
    if (Vector2.Distance(target.position, enemy.gameObject.transform.position) < 0.25f)
    {
        enemy.SwitchState(enemy.IdleState);
    }
}
There’s also the CheckForIntruder() that’s in the EnemyStateManager.cs script that’s getting called in the Update() for both the walk and idle state which is what determines when the player is close enough for them to enter the pre-attack state.
// Check if player is within the base
public void CheckForIntruder(EnemyStateManager enemy)
{
    if (Vector3.Distance(baseCenter.position, player.transform.position) <= baseRange)
    {
        enemy.SwitchState(PreAttackState);
    }
}
Pre-Attack & Attack State
Creating the pre-attack and attack states were definitely the most complicated and definitely got the messiest when it came to trying multiple ways to iterate it. (I will preface that the UI doesn’t work for the attack state, which is why I included the debug console where it prints when an enemy enters the attack state and attacks a the player.)
public void CheckRangeFromPlayer(EnemyStateManager enemy)
{
    // Check if in attack range
    if (Vector3.Distance(enemy.gameObject.transform.position, enemy.player.transform.position) < enemy.distanceToAttackPlayer)
    {
        playerIsClose = true;
    }
    else if (Vector3.Distance(enemy.gameObject.transform.position, enemy.player.transform.position) > enemy.baseRangeAI)
    {
        enemy.WalkState.timeLeftTilAttackAgain = 5;
        enemy.SwitchState(enemy.WalkState);
    }
    else
    {
        playerIsClose = false;
    }
}
The CheckRangeFromPlayer() is called from the pre-attack state. When the player is close enough they’ll go into the attack state but if they go too far from the base they’ll go back to the walk state and run back to the base. In GameManager.cs in Update() it checks if an enemy can attack yet since there’s a timer to help stop enemies from constantly attacking and not giving the player a chance to react.
void Update()
{
    AttackAI();

    if (!nextEnemyCanAttack)
    {
        AttackTiemr();
    }
}
The GetInAttackRange() is called in the attack state and is mainly to make sure the enemy is still close enough to the player to attack them, otherwise they’ll chase the player to a degree before giving up (this can help account for things like dashes/teleports which some of the characters have as abilities in Genshin). Once the attack was done they’d go into the walk state.
// Get close to the player to attack
public void GetInAttackRange(EnemyStateManager enemy)
{
    // Move towards player
    enemy.transform.position = Vector3.MoveTowards(enemy.gameObject.transform.position, enemy.player.transform.position, enemy.speed * Time.deltaTime);

    // Attack player if close enough
    if (Vector3.Distance(enemy.gameObject.transform.position, enemy.player.transform.position) < enemy.distanceToAttackPlayer)
    {
        enemy.gm.GetComponent<GameManager>().nextEnemyCanAttack = false;

        Debug.Log(enemy.name + " did damage!");

        enemy.WalkState.timeLeftToAttackAgain = 5f;
        enemy.SwitchState(enemy.WalkState);
    }
    else if (Vector3.Distance(enemy.gameObject.transform.position, enemy.baseCenter.position) > 5) // Remove enemy from preattack list
    {
        for (int i = 0; i < enemy.gm.GetComponent<GameManager>().preattackEnemies[i])
        {
            if (enemy.gameObject == enemy.gm.GetComponent<GameManager>().preattackEnemies[i])
            {
                enemy.gm.GetComponent<GameManager>().preattackEnemies.RemoveAt(i);
            }
        }

        enemy.WalkState.timeLeftToAttackAgain = 5f;
        enemy.SwitchState(enemy.WalkState);
    }
    else
    {
        enemy.WalkState.timeLeftToAttackAgain = 5f;
        enemy.SwitchState(enemy.WalkState);
    }
}
Hurt & Die State
Lastly came the hurt and die states. I will say I probably could’ve merge these into one state since if they were just destroyed at the end in the die state anyway there really isn’t a need for a separate state and could’ve just been checked and managed during their hurt state instead.
The TakeDamage() is made in the EnemyStateManager() that gets called in the Update() of every state (besides hurt and dead state). The tookDamage is set in the GameManager whenever the button is pressed for them to take damage. With an animation/proper attack system, this would’ve been placed on the OnCollisionEnter() function instead.
public void TakeDamage(EnemyStateManager enemy)
{
    if (tookDamage)
    {
        enemy.SwitchState(HurtState);
    }
}
TakeDamage() is called at Start() of the hurt state. It sets a bool named delay that was just there for debugging purposes. It has the AI wait X seconds so it gives the user time to be able to read the UI to see its current state. In-game that wait time would either be non-existent or be based on the length of the hurt animation.
private void TakeDamage(EnemyStateManager enemy)
{
    enemy.health -= 10;
    enemy.currentHealthUI.text = enemy.health.ToString();

    delay = true;
}